IKEA VISTHUS wardrobe assembly instructions
How to assemble the IKEA VISTHUS wardrobe (closet), step by step: 65 animated steps built from the official manual, about 4–6 h for 2 people, with Phillips screwdriver, flat screwdriver, hammer, pencil, drill, spirit level, Allen keys and spanner (included).
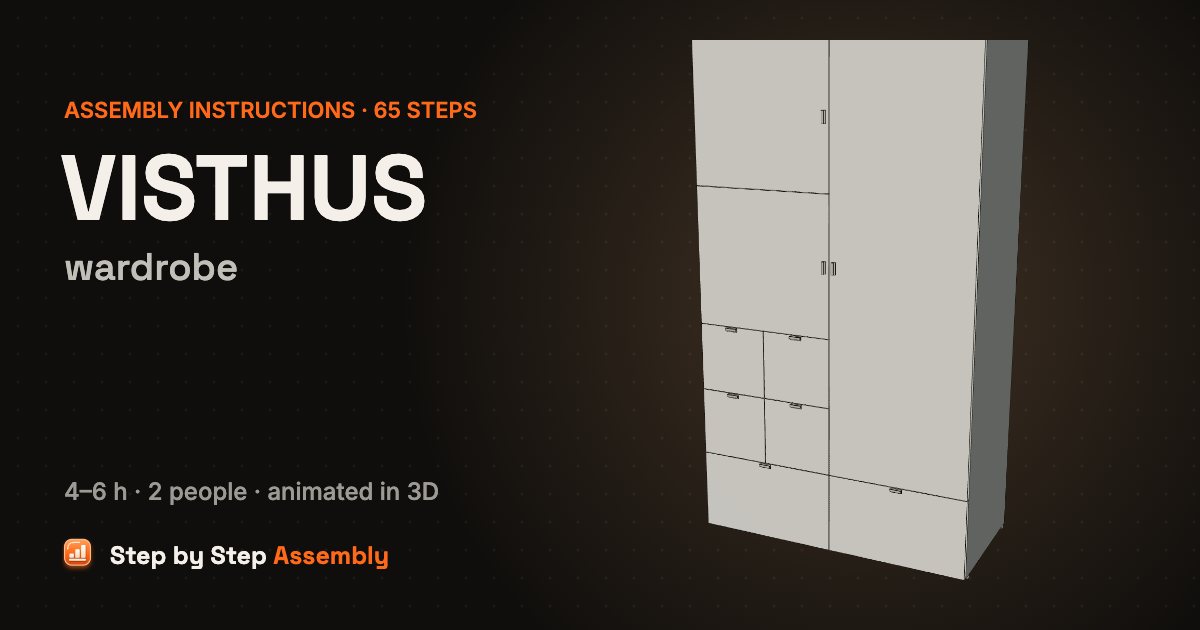
A grey and white wardrobe with three doors, a clothes rail, shelves, four small drawers on runners and two big drawers on castors: carcass built lying down, then stood up and fixed to the wall. Size: 122×59×216 cm (48×23 1/4×85"). About 4–6 h, 2 people. Tools: Phillips screwdriver, Flat screwdriver, Hammer, Pencil, Drill, Spirit level, Allen keys and spanner (included).
Based on the official IKEA manual AA-2314782-1 (PDF). Guide updated .
| Steps | 65 |
|---|---|
| Time | 4–6 h |
| People | 2 |
| Tools | Phillips screwdriver, Flat screwdriver, Hammer, Pencil, Drill, Spirit level, Allen keys and spanner (included) |
| Size | 122×59×216 cm (48×23 1/4×85") |
| Official manual | AA-2314782-1 |
| IKEA article number | 904.934.46 (grey white) |
| Pieces in the box | 272 |
In the box
| Part | Part number | Quantity |
|---|---|---|
| Side panel | 2 | |
| Middle divider | 1 | |
| Top panel | 1 | |
| Fixed bottom shelf | 2 | |
| Back panel | 2 | |
| Drawer shelf | 1 | |
| Small divider | 1 | |
| Small shelf | 2 | |
| Shelf | 5 | |
| Tall door | 1 | |
| Small door | 2 | |
| Big drawer (front, 2 sides, back, bottom) | 2 | |
| Small drawer (front, 2 sides, back, bottom) | 4 | |
| Screw | 146114 | 48 |
| Plug | 151706 | 8 |
| Pin | 151705 | 8 |
| Adjustable foot | 131399 | 6 |
| Screw | 100214 | 2 |
| Cap 152534/157484 | 2 | |
| Allen key | 100092 | 1 |
| Screw | 146899 | 4 |
| Rail holder | 152533 | 2 |
| Shelf support 152530/157485 | 42 | |
| Screw | 151743 | 9 |
| Handle | 10042149 | 9 |
| Cam bolt | 145718 | 24 |
| Cam lock | 119030 | 24 |
| Screw | 100224 | 8 |
| Connector | 130652 | 4 |
| Allen key | 100006 | 1 |
| Bumper | 107586 | 4 |
| Castor | 111401 | 8 |
| Screw | 146113 | 16 |
| Hinge | 152516 | 4 |
| Hinge | 152515 | 4 |
| Clothes rail | 146483 | 1 |
| Runner set 344835 (4 rails) | 4 | |
| Spanner | 131398 | 1 |
| Wall kit 327495: spacer 150688, knob 150689, washer 126916, screw 147968 or 158469, plug | 121714 | 2 |
Steps
- R runners on the divider and small divider — Open bag 1 and work on a rug or the opened carton. Lay the long middle divider and the small divider flat. Screw 2 runners marked R to each one, 3 screws (146114) per runner, with the rollers at the front edge. Check: This is a big, heavy wardrobe: two people are needed for several steps. Keep the runners marked R and L apart.
- Turn the small divider over — Turn the small divider over so its runners face down and the plain side is on top.
- L runners on the left side and small divider — Lay the left side panel flat, inside up. Screw 2 runners marked L to it and 2 more to the small divider, 3 screws (146114) each, rollers at the front.
- Top panel and left side — Stand the top panel on its front edge. Stand the left side panel on its front edge too, runners facing in, and slide it towards the top so the pins on its end drop into the keyhole slots. Push it down to lock.
- Middle divider — Tip the middle divider up onto its front edge, R runners facing the left side panel. Slide it onto the pins in the top panel and push it down.
- Right side panel — Stand the right side panel on its front edge, inside facing the divider. Slide it onto the top panel’s pins and push it down.
- Fixed bottom shelves — Lower the 2 fixed shelves between the panels near the bottom end, the edge with the 2 holes towards the back, and press them down onto the pins.
- Slide in the back panels — Slide the 2 back panels into the grooves from the bottom end, grey side down, one in each section.
- Push them home, remove the tape — Push both back panels all the way into the groove in the top panel. Then pull off the tape on each panel.
- Plugs through the back panels — Open bag 2. Push 8 plugs (151706) through the holes along the bottom of the back panels into the fixed shelves, 4 per section.
- Pins into the plugs — Press a pin (151705) into each of the 8 plugs to lock the back panels to the shelves.
- Wall spacers under the top — Open the wall kit (327495). Push the 2 spacers (150688) into the 2 pairs of holes under the top panel, in the back corners behind the back panels.
- Adjustable feet — Screw an adjustable foot (131399) into each of the 6 holes in the bottom ends of the side panels and the divider, by hand.
- Stand it up and turn it round — With a helper, tip the wardrobe up onto its feet, then turn it round so the front faces you. Check: Two people needed. Lift, don’t drag, and check there is room under the ceiling.
- Drawer shelf and small divider — Open bag 3. Stand the drawer shelf on its back edge. Push the small divider’s top-edge pins into the keyhole slots under the shelf, then slide it down to lock.
- Shelf supports for the drawer shelf — Push 4 shelf supports (152530/157485) into the holes in the left section: 2 in the left side panel and 2 in the divider, at the height shown.
- Fit the drawer shelf and small divider — Stand the drawer shelf and small divider upright, lift them into the left section and slide them in over the supports. Let the shelf rest on the supports.
- Screw the small divider down — From underneath, drive 2 screws (100214) up through the left bottom shelf into the small divider with the Allen key (100092).
- Knobs on the wall spacers — Only if your wall has a skirting board: from behind, screw a knob (150689) onto each wall spacer. Without a skirting board, leave the knobs out.
- Set the wall spacers — Turn the knobs out until the spacers stick out about as far as your skirting board is thick, so the wardrobe will stand straight against the wall.
- Against the wall — Move the wardrobe to its place and push it back until the spacers touch the wall and the bottom rests against the skirting board.
- Level it with the feet — Check the top with a spirit level. Turn the 6 adjustable feet in or out with the spanner (131398) until the wardrobe stands level and steady.
- Mark the wall — Read the tip-over warning. Reach in at the top and mark the wall through the hole in each wall spacer with a pencil. Check: The wardrobe must be fixed to the wall: it can tip over if a child climbs on it or hangs on a door. Use a step ladder.
- Move it away, start the holes — Pull the wardrobe away from the wall. Press a screwdriver tip into each mark to start the hole.
- Drill and plug the holes — Drill a hole at each mark: 8 mm for the plugs (121714) in a solid wall, 3 mm into a wooden stud. Push the plugs in, then put the wardrobe back against the wall. Check: Use fixings that suit your wall. If you are unsure, ask a specialist.
- Screw it to the wall — At each spacer, put a washer (126916) on a wall screw (147968; 158469 for a wooden stud) and screw it through the spacer into the wall. Click a cap (152534/157484) over each hole.
- Supports for the small shelves — Push 8 shelf supports into the small drawer compartments, 4 in each, just above the lower runners’ height (see the drawing).
- Small shelves — Open bag 4. Slide the 2 small shelves into the drawer compartments and let them rest on the supports.
- Supports for the shelves — Push 30 shelf supports into the holes: 3 rows of 6 in the left section and 2 rows of 6 in the lower part of the right section, at the heights you want. Check: You can also move the clothes rail down and add a shelf above it; see the drawings in the manual.
- Shelves — Slide the 3 shelves into the left section and the 2 shelves into the right section, onto the supports.
- Clothes rail holders — Screw a rail holder (152533) near the top of the right section to the divider and one to the right side panel, 2 screws (146899) each.
- Clothes rail — Put the clothes rail (146483) into the holders and press it until it clicks.
- Hinges 152516 on the tall door — Open bag 5. Lay the tall door flat, inside up. Press a hinge 152516 (with damper) into the round hole at each end of the door.
- Hinges 152515 on the tall door — Press a hinge 152515 into each of the 2 middle holes of the tall door.
- Tighten the hinges on the door — Tighten the 2 screws on each of the 4 hinges so they sit firmly in the door.
- Hang the tall door — With a helper, hold the tall door open next to the right side panel and push the hinge plates onto it so their screws line up with the holes. Check: The door is tall and heavy: one person holds it while the other fits the hinges.
- Screw the hinge plates on — Tighten the 2 screws in each of the 4 hinge plates to fix the door to the side panel.
- Handle on the tall door — Hold a handle (10042149) on the front at the door’s free edge and screw it on from the inside with a screw (151743).
- Hinges 152516 on the small doors — Lay the 2 small doors flat, inside up. Press a hinge 152516 into the round hole at the top end of each door.
- Hinges 152515 on the small doors — Press a hinge 152515 into the hole at the other end of each small door.
- Tighten the hinges — Tighten the 2 screws on each of the 4 hinges.
- Hang the small doors — Hang the upper small door on the left side panel, then the lower one below it: push the hinge plates onto the panel, then tighten their screws.
- Handles on the small doors — Screw a handle (10042149) to the free edge of each small door with a screw (151743) from the inside. Then close the doors.
- Connectors in the drawer sides — Open bag 5 (drawers). Lay the 2 sides of a big drawer flat, inside up, and tap a connector (130652) into the 2 holes at the front end of each with a hammer. Check: There are 2 big drawers: build the first one here, the second one the same way.
- Sides onto the drawer front — Stand the drawer front on its bottom edge, inside towards you. Stand the sides up and lower them so the connectors slide down into the slots in the front. Then tip it over onto the front.
- Back of the drawer — Lower the drawer back onto the ends of the sides, with the 4 large holes facing up.
- Cam bolts through the sides — Push 4 cam bolts (145718) through the holes in the sides into the back, 2 on each side.
- Lock the cams — Put a cam lock (119030) into each of the 4 large holes in the back, arrow towards the edge, and turn it clockwise with a flat screwdriver until it locks.
- Castors on the drawer bottom — Lay the drawer bottom flat. Screw a castor (111401) near each corner with 2 screws (146113).
- Slide the bottom in — Stand the bottom on its edge, castors facing out, and slide it down into the rebates in the sides until it meets the front.
- Screw the bottom on, stand it up — Drive 4 screws (100224) through the bottom into the back and the sides with the Allen key (100006). Turn the drawer onto its castors.
- Drawer handle — Hold a handle (10042149) at the top of the drawer front and screw it on from inside with a screw (151743).
- Bumpers on the drawer sides — Press a bumper (107586) into the hole near the front of each drawer side.
- The second big drawer — Build the second big drawer the same way (steps 42-51): connectors, sides, back, 4 cam bolts and locks, castor bottom with 4 screws, handle and 2 bumpers.
- Small drawer: sides onto the front — Open bags 3 and 4 for the small drawers. Stand a small drawer front on its bottom edge, lower the 2 sides into the slots on its inside, then tip it over onto the front.
- Slide in the drawer bottom — Slide the thin drawer bottom down into the grooves in the sides, all the way to the front.
- Drawer back — Lower the back between the sides so its lower edge sits over the drawer bottom. Don’t force it: if it doesn’t go, check that the bottom is in the grooves.
- Cam bolts — Push 4 cam bolts (145718) through the sides into the back, 2 on each side.
- Lock the cams — Put 4 cam locks (119030) into the holes in the back and turn them clockwise to lock.
- Runners on the drawer — Screw a drawer runner (from set 344835) along the bottom edge of each side with 3 screws (146114), roller at the back.
- Stand it up, fit the handle — Turn the drawer upright. Hold a handle (10042149) at the top of the front and screw it on from inside with a screw (151743).
- Three more small drawers — Build the other 3 small drawers the same way (steps 52-58): sides, bottom, back, 4 cam bolts and locks, 2 runners with 6 screws, and a handle.
- Push in the big drawers — Roll the 2 big drawers into the spaces under the bottom shelves.
- Insert the small drawers — Lift each small drawer to its opening, tip the front up slightly so the rollers at the back pass the runners’ front rollers, then push it in until it drops into place.
- Done! — Your VISTHUS wardrobe is ready. If a door hangs crooked, adjust it with the screws on its hinges. Keep it fixed to the wall and put heavy things in the bottom drawers.
VISTHUS wardrobe: questions and answers
How long does it take to assemble the IKEA VISTHUS wardrobe?
About 4–6 h for 2 people, working through the 65 steps of this guide. Unpack and sort the hardware first: the In the box list has every part with its count, so you can check nothing is missing before you start.
What tools do I need for the VISTHUS wardrobe?
Phillips screwdriver, flat screwdriver, hammer, pencil, drill, spirit level, Allen keys and spanner (included). Already in the box: Allen keys and spanner.
Can one person assemble the VISTHUS wardrobe?
It is planned as a 2-person build. One person can do most of it, but get help for steps 2, 5 and 14, where the furniture is lifted or turned.
Does the VISTHUS wardrobe need to be fixed to the wall?
The manual shows a wall fixing: see step 12 (Wall spacers under the top) and step 19 (Knobs on the wall spacers). Use screws and plugs that suit your wall (wood, brick, concrete or plasterboard), and ask at a hardware store if you are not sure. Tall furniture and drawer units that are not fixed to the wall can tip over.
What size is the VISTHUS wardrobe once assembled?
122×59×216 cm (48×23 1/4×85"), as given for this model. Leave extra floor space around it while you build, and room to lift or stand it up.
How many screws and fittings come with the VISTHUS wardrobe?
239 fittings of 22 kinds, the most numerous being 48 × screw, 42 × shelf support 152530/157485, 24 × cam bolt. The In the box table lists every one with its part number, so you can count them before you start.
Where can I download the IKEA VISTHUS wardrobe assembly instructions PDF?
The official PDF is manual AA-2314782-1, free from ikea.com; this guide links it next to the steps. To find the product page with its documents, search ikea.com for article number 904.934.46 (grey white); other colours have their own numbers but usually the same manual.
Which IKEA manual is this guide based on?
The official manual AA-2314782-1. Manuals and fittings change over time, so compare this code with the one printed on your paper manual. If they differ, follow your paper manual.
What if a part or screw is missing?
Check every box and all the packaging first: small fittings are often taped inside. Each fitting in the In the box list has its IKEA part number (for example screw 146114). IKEA customer service can send replacement fittings using that number.
Related assembly guides
- IKEA PAX wardrobe frame assembly instructions
- IKEA BRIMNES wardrobe with 3 doors assembly instructions
- IKEA HAUGA wardrobe with sliding doors assembly instructions
- IKEA KLEPPSTAD wardrobe with sliding doors assembly instructions
- IKEA RAKKESTAD wardrobe with 3 doors assembly instructions
- IKEA IDANÄS wardrobe assembly instructions
- IKEA RAKKESTAD wardrobe with 2 doors assembly instructions
All wardrobes assembly guides · All furniture assembly guides
Stuck on a step? Common assembly problems and fixes · Furniture hardware explained